PLEASE NOTE: Dog Garden Flags are currently unavailable. Please check back later. Thanks for your interest.
How To Make Your Own Dog Bed
On a Budget or Just Feeling Crafty? I'm going to show you how to make your own dog bed using the items you already own! We'll even show you how to customize the bed to fit the needs of your own dog.
Let's Get Started!
How To Make Your Own Dog Bed- No Sewing Required
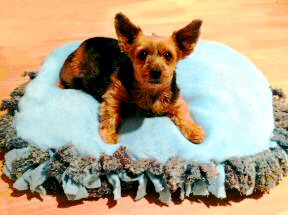
 My Yorkshire Terrier, Miss Muffin, sitting on her brand new, custom made, super soft and cozy dog bed.
I will explain how to customize the plans for do-it-yourself:
- Orthopedic Dog Beds
- Heart Shaped Dog Beds
- Memory Foam Dog Beds
- Heated Dog Beds
- Personalized Dog Beds
Supplies Needed:

Sharp Scissors
Marker
2 Blankets or 2 pieces of fabric
Stuffing (any kind, as explained in the following steps)
Measuring tape (optional)
There's no easier or cheaper way to make your own dog bed! And nothing is more budget-friendly than repurposing stuff you already own.
Don't have a couple of old blankets laying around, but still need a cheap dog bed?
Goodwill and Church thrift stores are a great resource for cheap blankets. A perfect way to save money, support your community, repurpose and save items from the landfill... and make your own dog beds, cheap!

Step 1:

Start with 2 clean blankets. You will be cutting them up in the next few steps, so you'll need blankets that aren't important to you.
Or, if you happen to have old fabric from another project laying around, that would be great as well!
Lay them out on a flat surface, one on top of the other.
Step 2:
For this "Make Your Own Dog Bed" demonstration I'll be making an rectangular shaped bed, no pattern required. In fact, a pattern isn't really necessary for any shape of dog bed.
If you notice in the picture above, I've taken my sharpie and drawn out a rounded rectangle on the top blanket. The shape I've drawn is about 36 x 40 inches in size. This will make a small-medium sized dog bed, about 28" x 32" when finished.
Since the blanket is already rectangular, getting a nice rounded rectangle is easy.
If you're worried about having sharpie marks on your finished dog bed, draw your shape a little larger, then make your cuts on the inside of the marks.
Step 3:
Keeping the blankets together, cut through both until the entire piece is cut out. Do not discard the scrap pieces.
Step 4:

Measure about 4 inches in on the edges of the blanket/fabric. Cut 4" long strips around the entire outside edge of your fabric. You can just "eyeball" the four inches after measuring the first cut, or if you don't have a measuring tape.
Cut the strips about 1 to 1-1/2 inches in thickness. Again, an exact measurement isn't critical. Just try to make all the strips about the same width for a more aesthetically pleasing look.
Be sure to cut through both blankets as you're cutting the strips.
Step 5:

Once the strips have been cut all the way around the blankets, grab one strip from the top blanket and tie it together tightly in a double-knot with the corresponding strip from the bottom blanket.
Continue this process until all the strips have been knotted together, with the exception of about the last 10 strips. Example below.

Step 6:
This opening is where you will begin placing your stuffing.
If you happen to have an old dog bed that needed replacing anyway, you could use that stuffing for this bed. But if not, you can use nearly anything else as stuffing, starting with the left-over (and shredded) pieces of blanket that you just cut your DIY dog bed from.
Old clothing can be shredded and used as stuffing. In addition, you can use stuffing from old pillows, egg crates, styrofoam balls from old bean bags, shredded pieces of other old blankets, polyfill, old poofs, etc.
If you don't need an orthopedic dog bed or a heated dog bed, skip to step #7.
Do It Yourself: Orthopedic Dog Bed
To make your own orthopedic dog bed, purchase a memory foam mattress topper, or use one of your own that needs replaced. These work great because you can double or triple the layers to make your dog's new bed extra cushion-y!
I chose to make Muffin's dog bed more pillow-style. To do this, I cut the memory foam into uniform-sized, trapezoid-shaped pieces. It was like my little best friend had her very own MyPillow!
It worked perfectly and was super cushion-y and comfortable for my aging dog.
Do It Yourself: Heated Dog Bed
To make your own heated dog bed, you can add a Large Hot Water Bottle.* This works great for hairless and elderly dogs, or any dogs who get cold at night. Chihuahuas and many of the smaller, short-haired breeds might appreciate it. If your dog shivers at night, this is a tried and true perfect solution.

These actually stay warm for several hours!
Perfectly safe and everyone sleeps soundly, and WARMLY.
To add a heated water bottle to this Do-it-yourself dog bed, tie single knots instead of double knots into the last 10-15 strips. This way you can get the bottle out and warm it back up every evening.
Note: Don't use hot-hot water. It's not necessary. Bath temperature water is perfect and will stay warm through the night.
Great for winter nights and people who keep their air conditioning set to "North Pole" in the summer.
Step 7:
Once you've added all of your stuffing and arranged it inside the bed in a uniform manner, finish tying the rest of the strips together.

Step 8:
Lay it at your feet to make a nice resting spot for your eternally grateful, nap-loving best friend!
Step 9:
Move it to the far corner of the room when the snoring begins!
That's all there is to it! Want to skip all the steps and have one delivered tomorrow? Check out the already-made dog beds here!
Learn more about me, my art, the mission of this site and Rescue Dogs Are Better here.
We also welcome you to contact us if there are any other questions we can answer for you about anything you saw or read on this site.
*As an Amazon Associate I earn a small amount from qualifying purchases. Thanks so much for supporting our mission to de-stigmatize rescue dogs and spread awareness about puppy mills.


New! Comments
Leave us a comment if you have something you'd like to share or add to what you just read here. Or contact us with questions or comments.