PLEASE NOTE: Dog Garden Flags are currently unavailable. Please check back later. Thanks for your interest.
Dog Clothes Patterns
Simple and FREE!
Use these free dog clothes patterns to create your own look!
In the demonstration below I will be repurposing / upcycling a t shirt to make the dog hoodie on the right, but you could easily use your own material.
However,
one of the many great things about repurposing a t shirt is the fact
that they can be found very inexpensively and in a great variety of
sizes and colors!
Jersey knit can be very expensive in fabric stores and there usually isn't a whole lot to choose from.
How To Find
Cheap Material For Dog Clothes Patterns...
(You're Welcome)
Inexpensive material can be found virtually anywhere. I mentioned t-shirts, but many clothing items found at Goodwill or other used clothing stores and garage sales (for instance) can be cut up and repurposed for all the dog clothes patterns I will be showing you! Buy up all the 50¢ t-shirts you can get your hands on and you'll be set for dog clothes forever!
Aside from being "cheap", lightly used clothing items also take a lot of finishing work out of your sewing projects! Less money + less time + less work = More dog clothes!
Let's get started!
Supplies
Large sheet of paper (kraft paper works well and it's easy to find)
Scissors
Marker
Stretchy Fabric
Tape Measure
Sewing machine (or needle and thread)
Pins- if you're a pinner. I don't use pins. I am more of "short-cut" kind of girl :)
If you don't intend to create your own pattern, you will also need this printable PDF pattern.
How to Make Your Own Pattern
The pattern will fit a dog between 8-12 pounds, give or take.
You can use the instructions detailed on the rest of the page to create your own pattern (if you need larger or smaller), or adjust the provided pattern appropriately where needed.
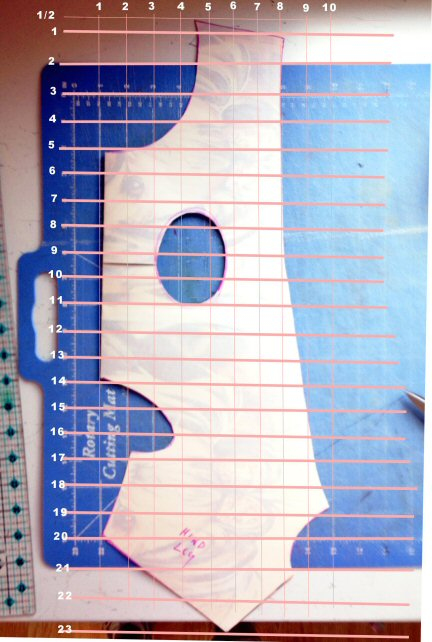
Pic 1. In the first picture I have created the pattern. To create your own pattern, use my measurements as a jumping off point (and the basic shape of this pattern) to make your own. My dog is small, about 7 pounds. She is a Chinese Crested so her body is slightly longer than a Yorkshire Terrier (for example) of the same weight might be.
Take a large sheet of craft paper and fold it in half. The crease is on the belly side (which is the left side in my pic above). Folded in half, my sheet of paper measured 23.5" x 10". Yours may end up being larger or smaller.
How To Determine Your Own Measurements
If you think this pattern will fit for your dog as is, you can skip this section.
If you're an experienced seamstress, determining your own measurements will be easy for you. If you're not an experienced seamstress, this is how I measured my dog for the pattern.
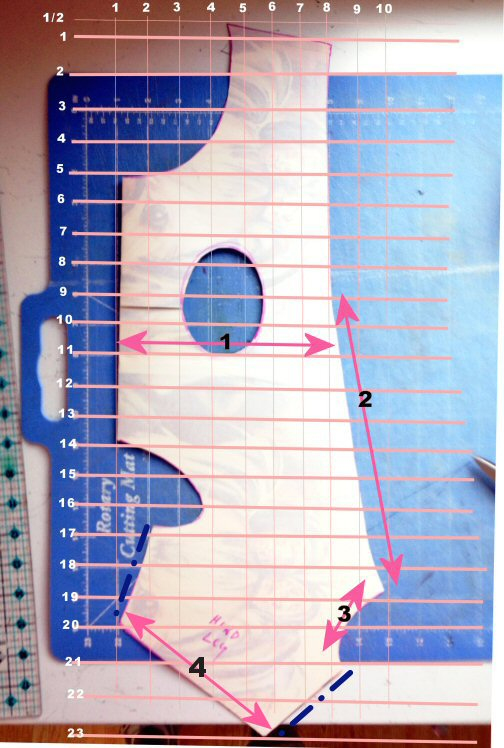
Line #1, my dog is 13.5" around the largest part of her chest (measured just behind her front legs), get the measurement, add 1/2" for comfort and 1/2" for seam allowance, divide by 2.
Line #2, From just between her shoulder blades to the base of her tail, my dog is around 10" long.
Line #3 is the back of the legs and the cut out for the tail. The
easiest way to determine this measurement is to measure the dog from mid
thigh to mid thigh going over the tail in a U-shape with a tape
measure, add 1/2" for seam allowance, then divide by 2.
Line #4 is the measurement you will take to make your own hind leg cuff pattern. In
this example, my cuff would need to be 6 1/4" wide and about 2 1/2" tall, a rectangle (as shown a few picture below). 6 1/4" is the total length of line 4 in my example pattern above. A 2 1/2" tall cuff will make about a 1" cuff around the hind leg once sewn on to the main part of the pattern.
To
measure the oval-shaped hole for the (front leg) sleeves... Notice the top arrow point (#2)
for the shoulder blades falls right about the middle of the oval hole. For my dog, the measurement is about 3 1/2" tall and a
little less than 3" wide.
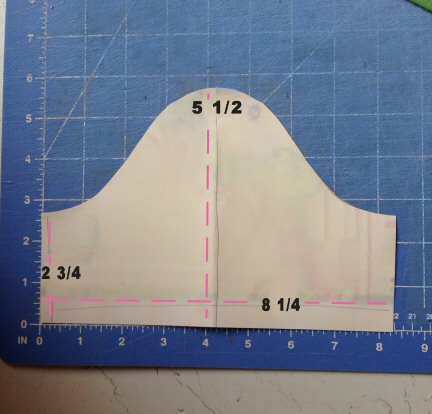
This is the basic shape of the sleeves. If you needed to make your sleeve hole larger than the oval sleeve hole in my example, your sleeve pattern will need to be larger as well.
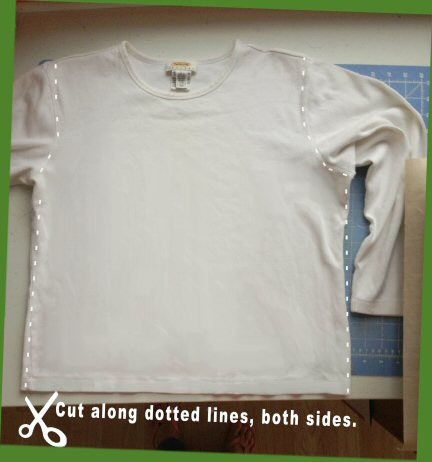
Use an old t shirt out of you closet for your first practice dog hoodie. Cut the side seams off as well as the sleeves as shown in the example above. Leave the shoulder seam intact.
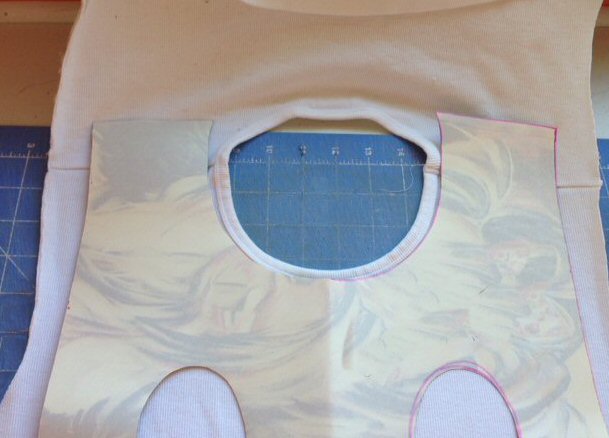
Unfold your pattern and lay it over the shirt as shown above. The neck may not line up perfectly, but that's okay. Get it as close as possible, but be sure the shoulder seams are even on both sides. Trace your pattern and cut it out.
*NOTE*
If your dog clothes pattern is longer than your t shirt, here is where you can get creative! Evenly place another piece of material under the pattern, right about where the waist line will eventually be. Make sure to fold the original t shirt out of the way (or cut it off) and line up the two pieces of material evenly under the pattern. This will give the jammies the look of having "pants".
You will then need to sew across this extra seam before moving on, but it will be worth it.
Your dog clothes pattern can now be set aside!
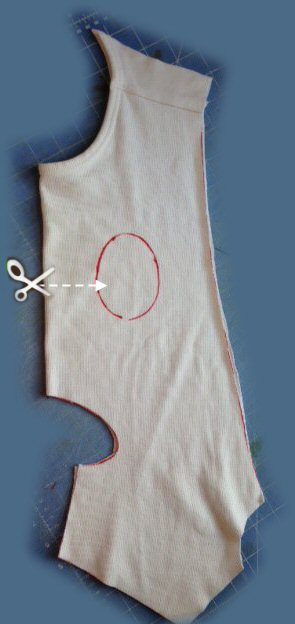
Folded in half your newly cut fabric should line up perfectly. Cut a line through the center of the sleeve hole as shown with the dotted lines above and then cut out the sleeve hole.
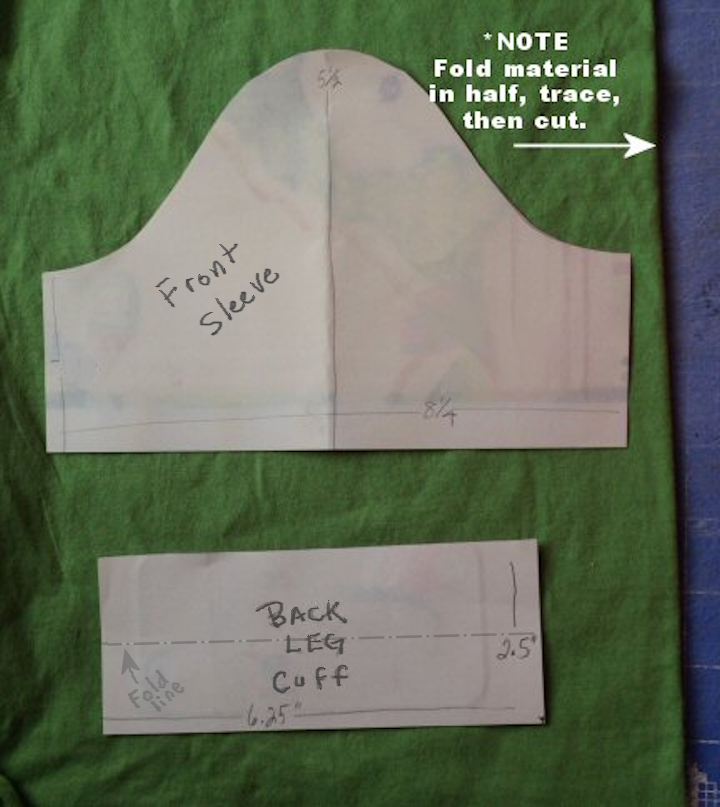 To make 2 identical leg cuffs and 2 identical front sleeves, fold the fabric in half and trace the pattern over the double layered fabric. The dotted line represents where the fabric will fold once cut.
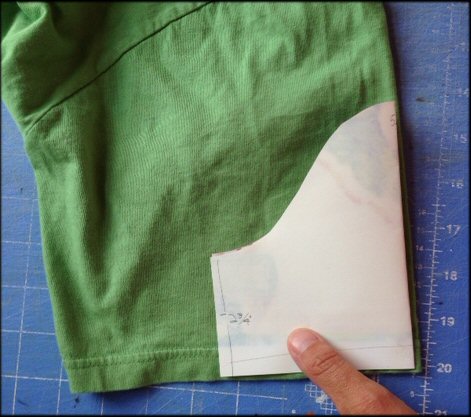 To use the existing hem of a repurposed t-shirt, fold the pattern in half as shown and lay it on the shirt sleeve as shown.
Now, using a different color t shirt (if you wish), lay the sleeve pattern and back leg cuff pattern pieces on the folded material, trace, then cut out.
In the picture on the top right, I have shown you how you might like to use a shirt sleeve to trace your pattern from. This will save you the extra step of hemming as the shirt sleeve already has a nice hem :)
Now to begin sewing!
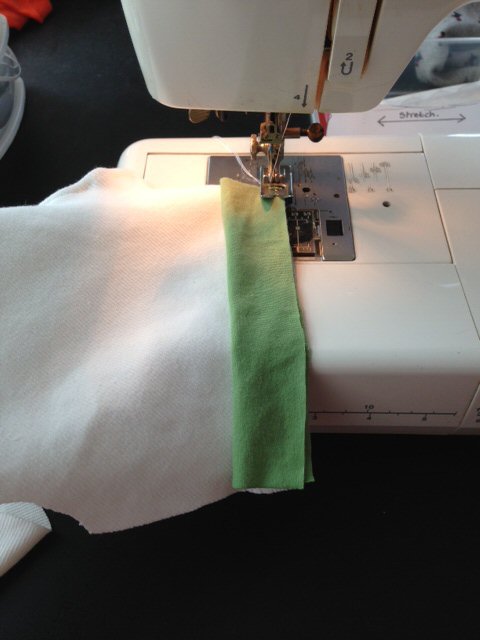
1. Fold one of your leg cuffs in half (green material in the example above) and line it up with the bottom of the hind leg on the main part of the dog clothes pattern. The two "right" sides of the material should be face to face. Do the same on both legs.
2. Fold the back legs in half as shown in the middle picture above and sew a seam down the back of the leg. Do this on both legs.
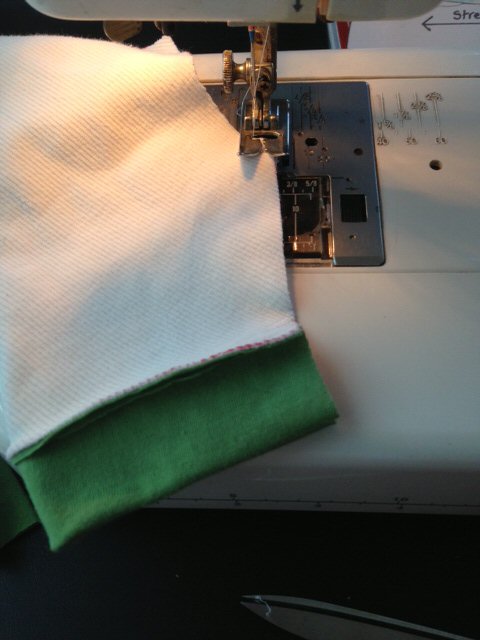
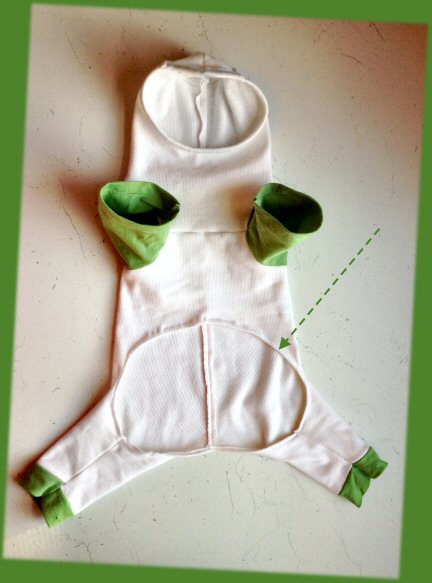
3. Sew your sleeves on the same way, right side to right side. Once the sleeves are on, now is the time to hem them if you didn't use the existing hem from another shirt. Above right picture shows the progress so far, inside out.
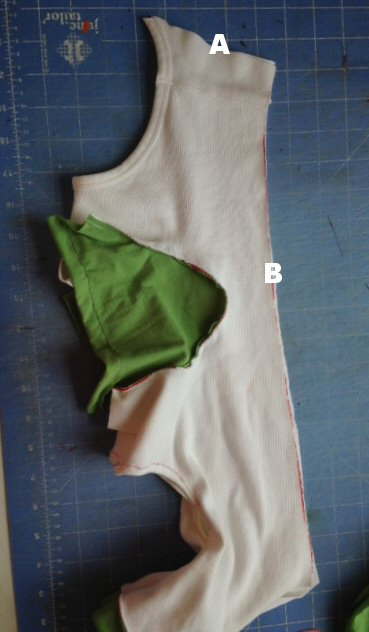
4. Keep the pattern inside-out and sew one long seam all the way across sides A and B (shown above, right). You're almost finished!
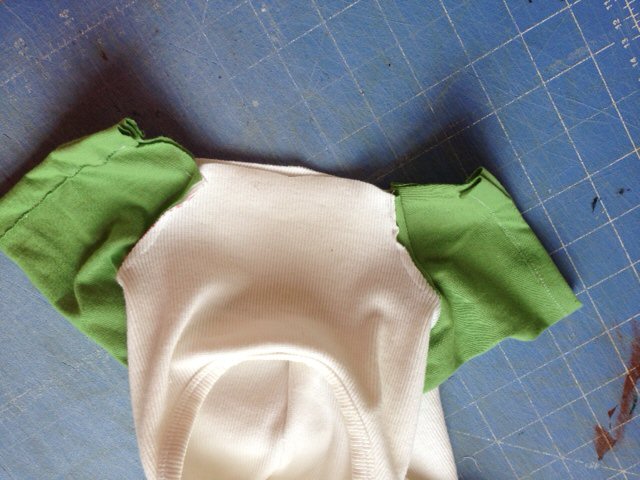
Keep inside-out and line up both sleeves and the chest area and sew one long seam all the way across, turning the material a little under the needle at each intersection.
The only hem left to sew is the circle around the under-belly. It's worth noting here that my dog is female. However, I think this pattern will also accommodate a male dog and his ability to potty without peeing on his clothes. If you're concerned at all about the clearance on the underneath... Before you sew your last hem, it is possible to still remove a little more material at the top of the circle.
If you're a pinner, this wouldn't be a bad place to pin. I roll my hem as I go. It's just easier for me.
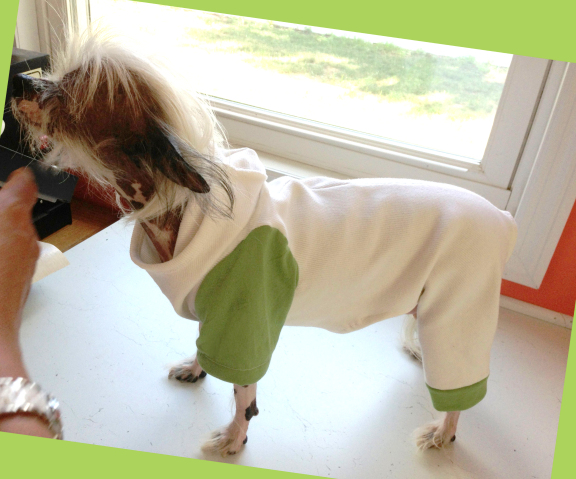
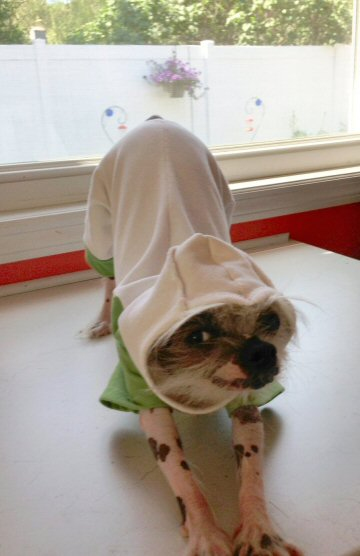
I woke up Miss Dottie to try on her new outfit! While she was giving me the stink-eye, she couldn't resist a stretch in her cozy new outfit that stretches right along with her. One of the main reasons that I prefer jersey knit or t shirt material.
It's also worth mentioning here that Miss Dottie wears most of her clothes inside-out, for comfort. She happens to have very sensitive skin. For the picture, she is wearing it right side out, but it looks just as cute either way!
VIDEO
If you're a newbie to sewing, the video may help you...
I designed this dog clothing (pajama) pattern. Please respect the copyright of this entire page. Feel free to utilize this pattern for your own personal use only. Also, feel free to share or pin this page or any of the pictures, but refrain from taking ownership of any of the contents herein.
New Dog Clothes Patterns coming soon!
Have a question? I'd be glad to hear from you!

New! Comments
Leave us a comment if you have something you'd like to share or add to what you just read here. Or contact us with questions or comments.